Rancher下部署Redis集群
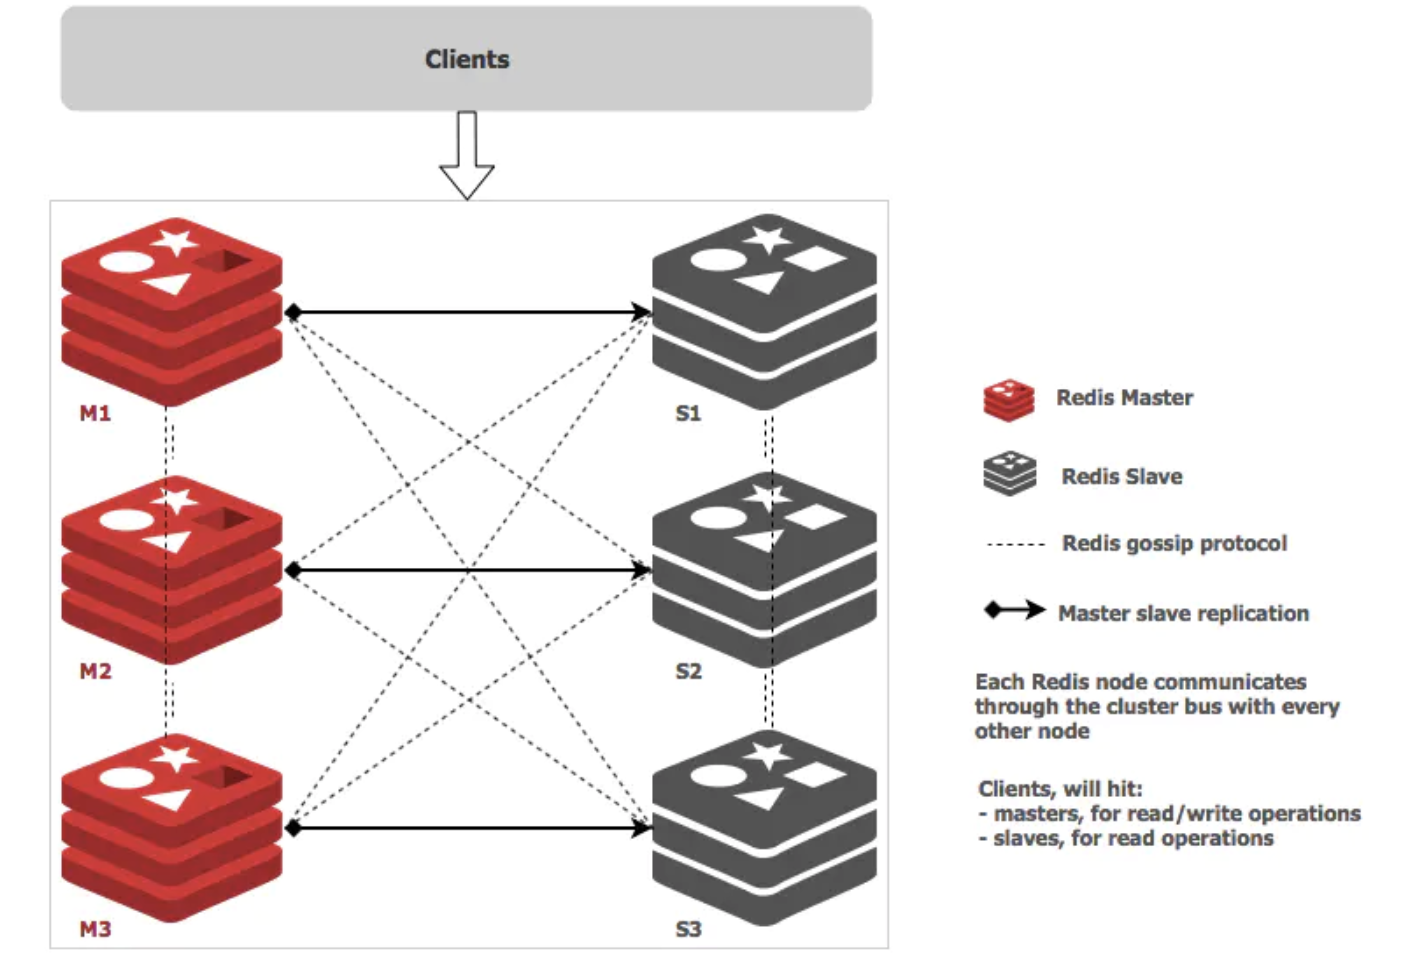
一个最小的redis集群,需要3个主节点,以及3个从节点,每个主节点对应一个从节点,主从做数据备份,主节点间做数据分片。当Master掉线后,redis cluster集群会从多个Slave中选举出来一个新的Matser作为代替,而旧的Master重新上线后变成 Master 的Slave。
在Rancher上部署redis集群,需要对每个节点的配置和数据做持久化,并且要确保节点pod重建以后,配置和数据不变,并可以自动将新的pod ip注册到集群。
因此需要结合StatefulSets(有状态集)服务和持久卷来确保redis集群的正确运行。
Statefulset 的设计原理模型:
- 拓扑状态:
应用的多个实例之间不是完全对等的关系,这个应用实例的启动必须按照某些顺序启动,比如应用的主节点 A 要先于从节点 B 启动。而如果你把 A 和 B 两个Pod删除掉,他们再次被创建出来是也必须严格按照这个顺序才行,并且,新创建出来的Pod,必须和原来的Pod的网络标识一样,这样原先的访问者才能使用同样的方法,访问到这个新的Pod。 - 存储状态:
应用的多个实例分别绑定了不同的存储数据.对于这些应用实例来说,Pod A第一次读取到的数据,和隔了十分钟之后再次读取到的数据,应该是同一份,哪怕在此期间Pod A被重新创建过.一个数据库应用的多个存储实例。
使用statefulset服务部署,无论是Master 还是 slave都作为statefulset的一个副本,通过pv/pvc进行持久化,对外暴露一个service 接受客户端请求。
部署StatefulSets类型的负载需要安装NFS client provisioner, 利用 NFS Server 给 Kubernetes 作为持久存储的后端,并且动态提供PV。
默认 rancher 2 的存储类中的提供者不包含NFS,需要手动添加;添加方式有两种:
- 从应用商店直接安装配置 nfs-client-provisioner (需手动添加仓库,该仓库是从helm官方代码库复制自己需要的应用代码并定制的)
- 手动创建 nfs-client-provisioner 存储类
如果使用StatefulSets类型的工作负载,只需要创建1个工作负载,在工作负载内启动6个pod即可。因为我这边没有安装nfs-client-provisioner。就以Deployment类型工作负载代替StatefulSets类型工作负载(用StatefulSets类型工作负载也没有什么问题),需要创建6个工作负载,在每个工作负载启动1个pod。
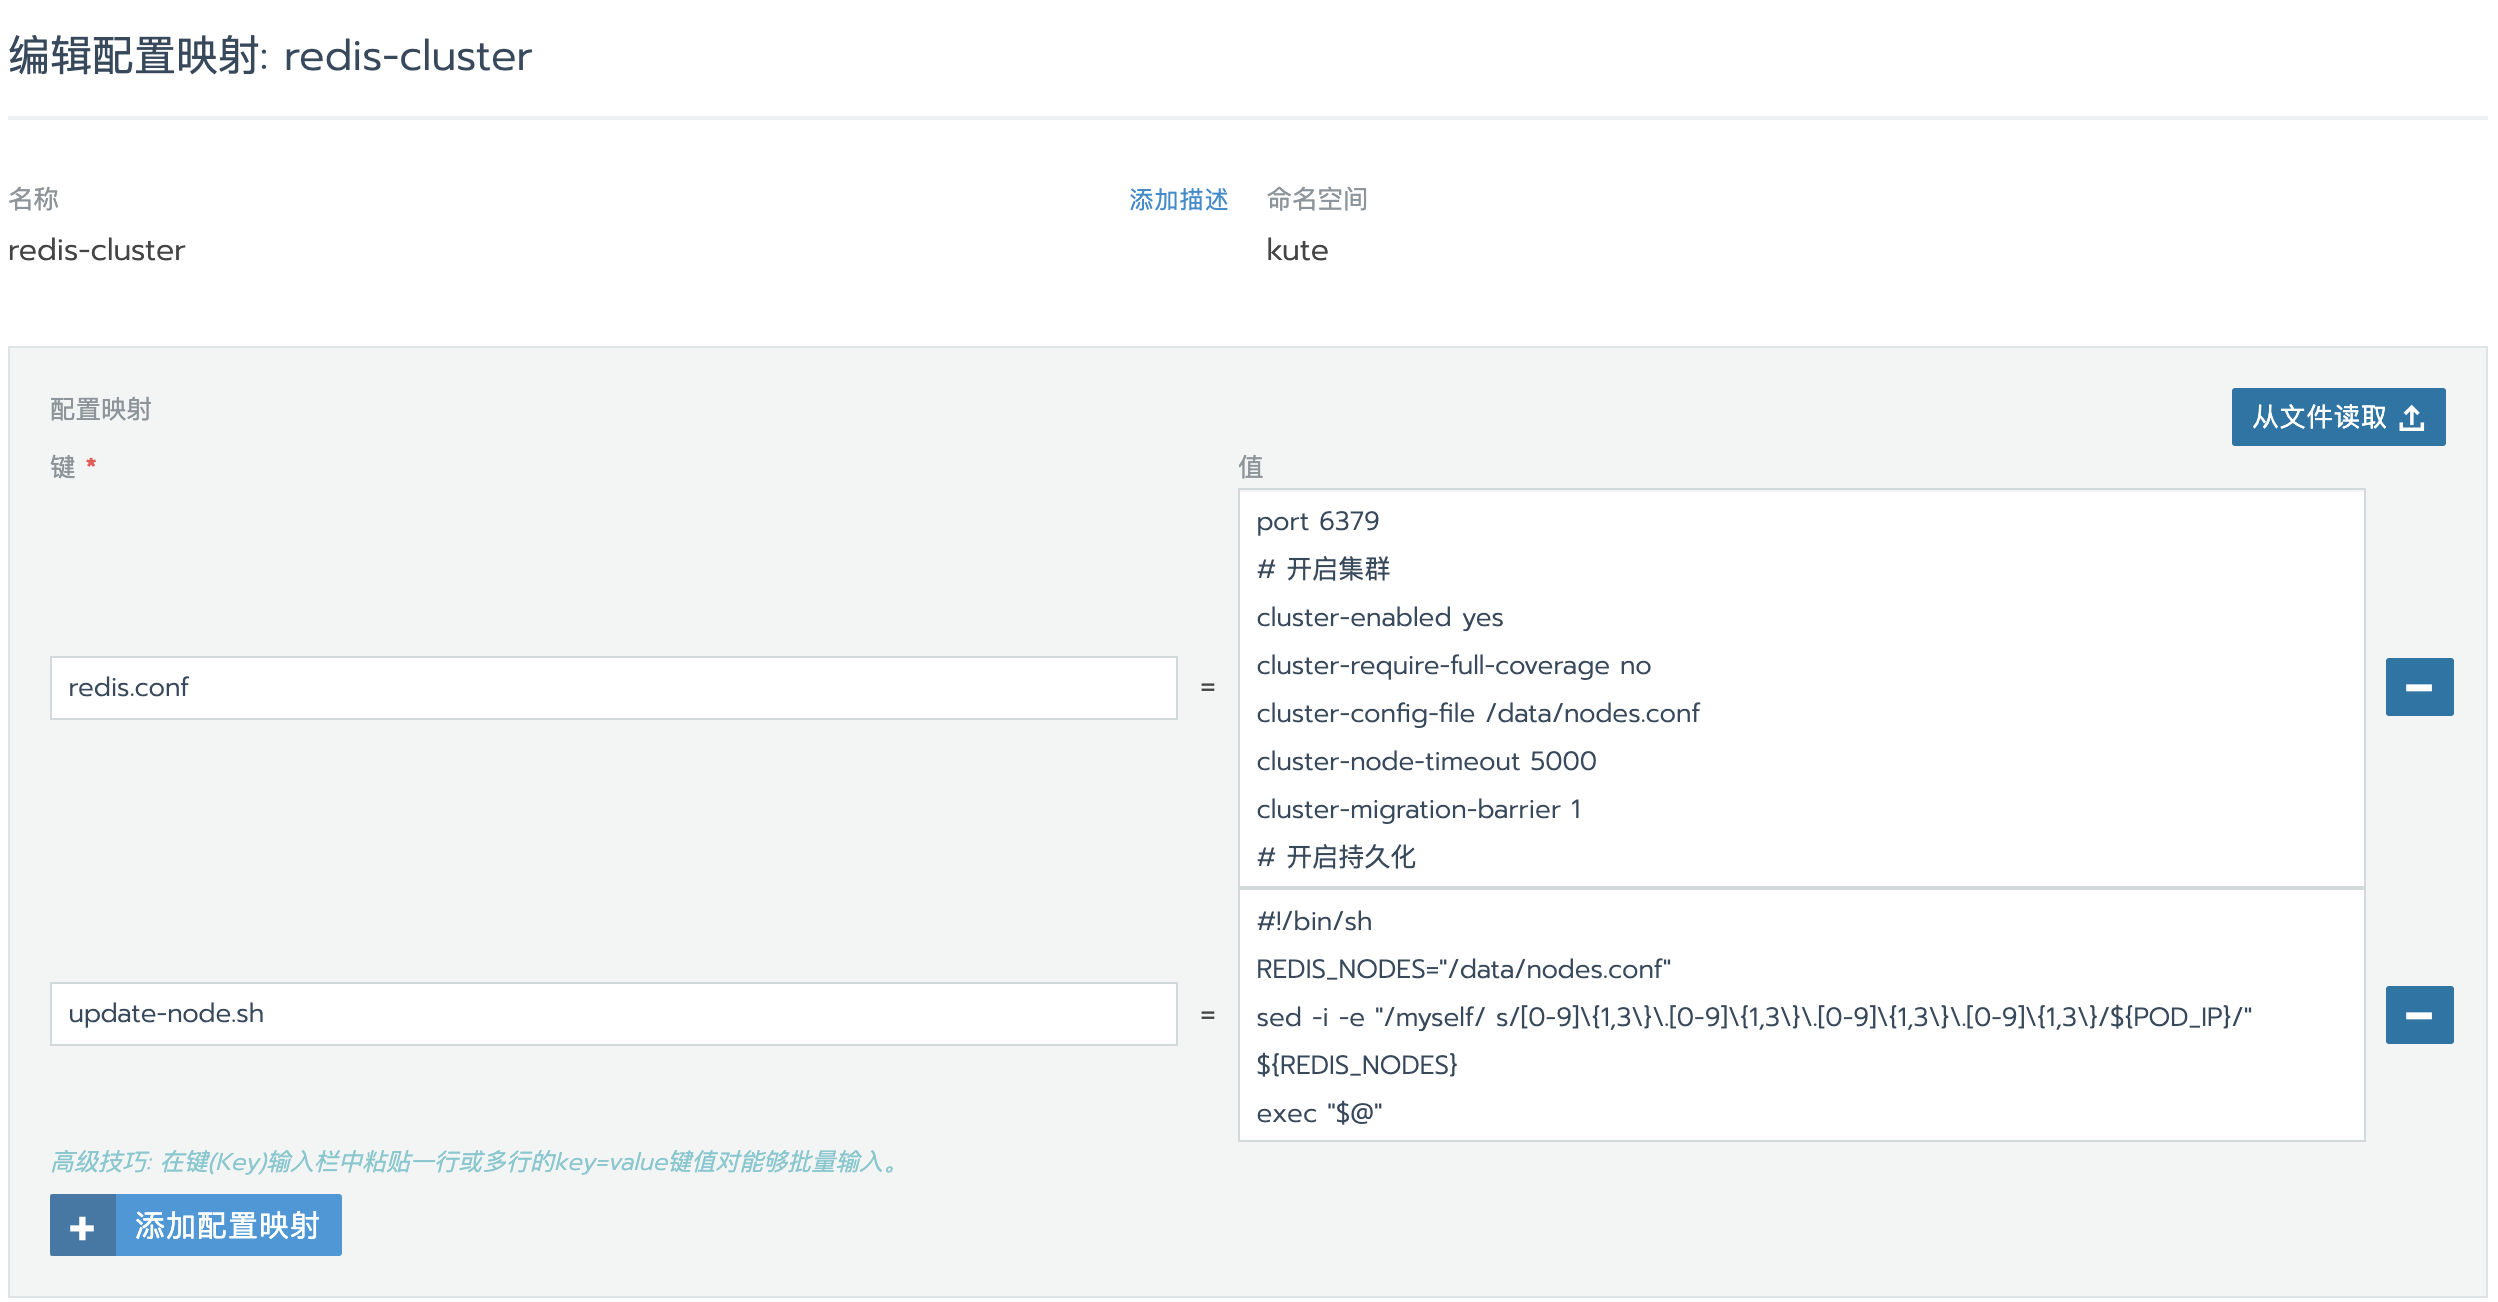
创建配置映射
redis.conf
port 6379
# 开启集群
cluster-enabled yes
cluster-require-full-coverage no
cluster-config-file /data/nodes.conf
cluster-node-timeout 5000
cluster-migration-barrier 1
# 开启持久化
appendonly yes
protected-mode no
# 密码
requirepass 123456789完整redis配置,可以在这里查看
update-node.sh
#!/bin/sh
REDIS_NODES="/data/nodes.conf"
sed -i -e "/myself/ s/[0-9]\{1,3\}\.[0-9]\{1,3\}\.[0-9]\{1,3\}\.[0-9]\{1,3\}/${POD_IP}/" ${REDIS_NODES}
exec "$@"
update-node.sh是为了pod启动和创建时,把IP地址写入到集群nodes配置中
创建工作负载
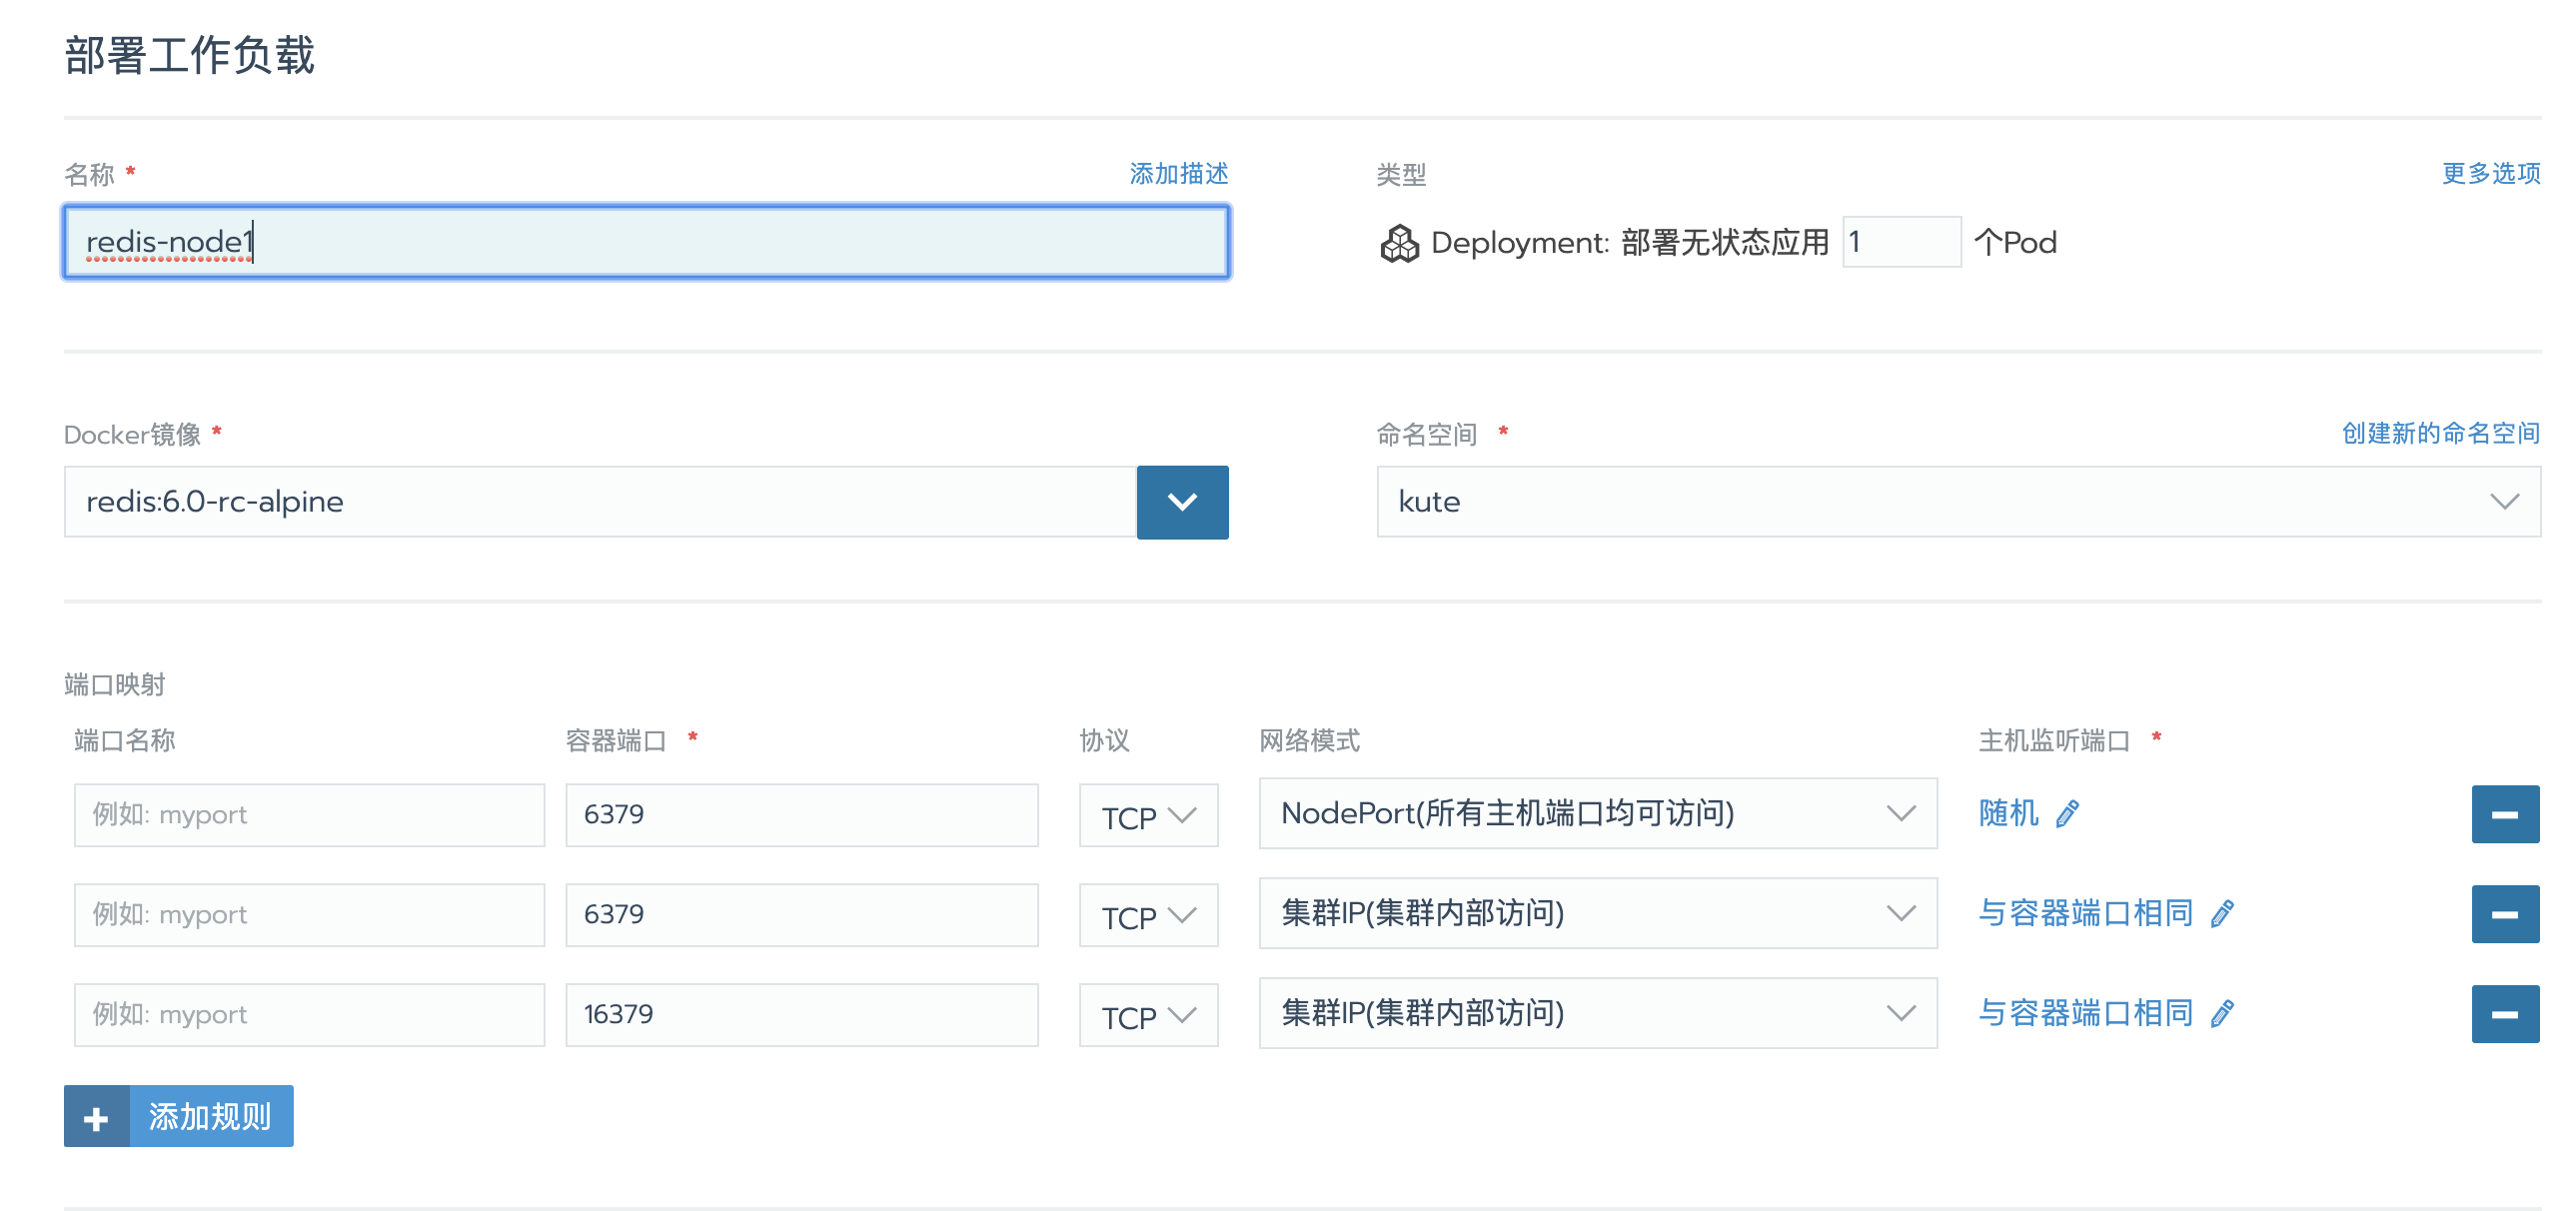
配置端口映射
如上图,根据自己需求配置端口映射。redis默认客户端端口为6379,redis集群不仅需要开通redis客户端连接的端口,而且需要开通集群总线端口,集群总线端口为redis客户端连接的端口 + 10000。如redis端口为6379,则集群总线端口为16379。
设置环境变量
设置环境POD_IP,是为了在执行update-node.sh脚本时,能更新本机IP到nodes.conf
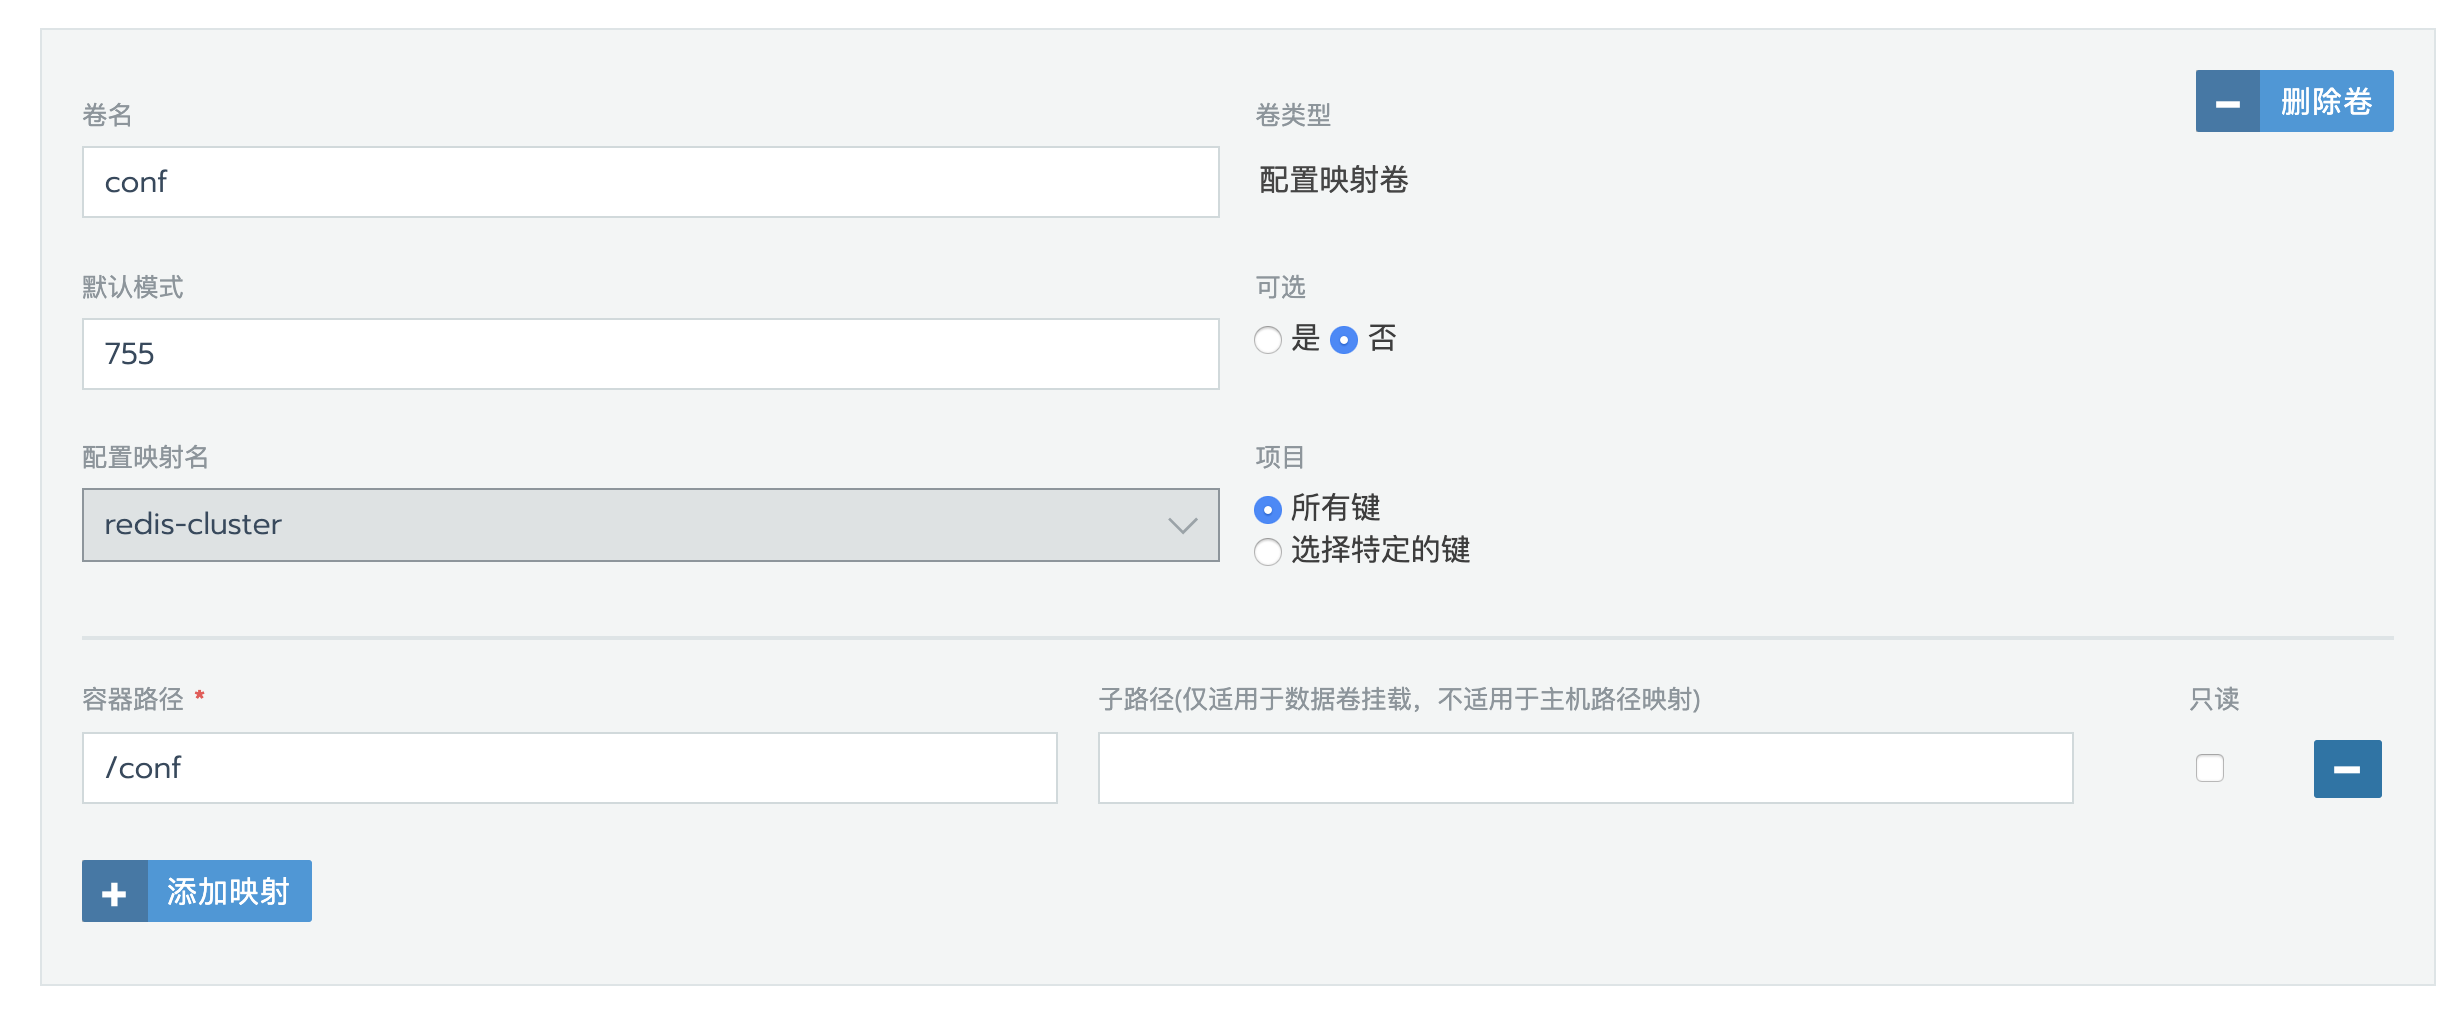
挂载数据卷
挂载配置文件数据卷
挂载持久化数据卷
挂载路径根据实际情况填写,如果安装了nfs-client-provisioner,可以选择pvc模版动态分配pv
设置启动命令
启动命令:
/conf/update-node.sh redis-server /conf/redis.conf添加标签
这个标签在后面创建集群时会用到,主要用来筛选符合条件的pod
启动Pod
按照以上步骤创建6个工作负载,并启动pod
创建集群
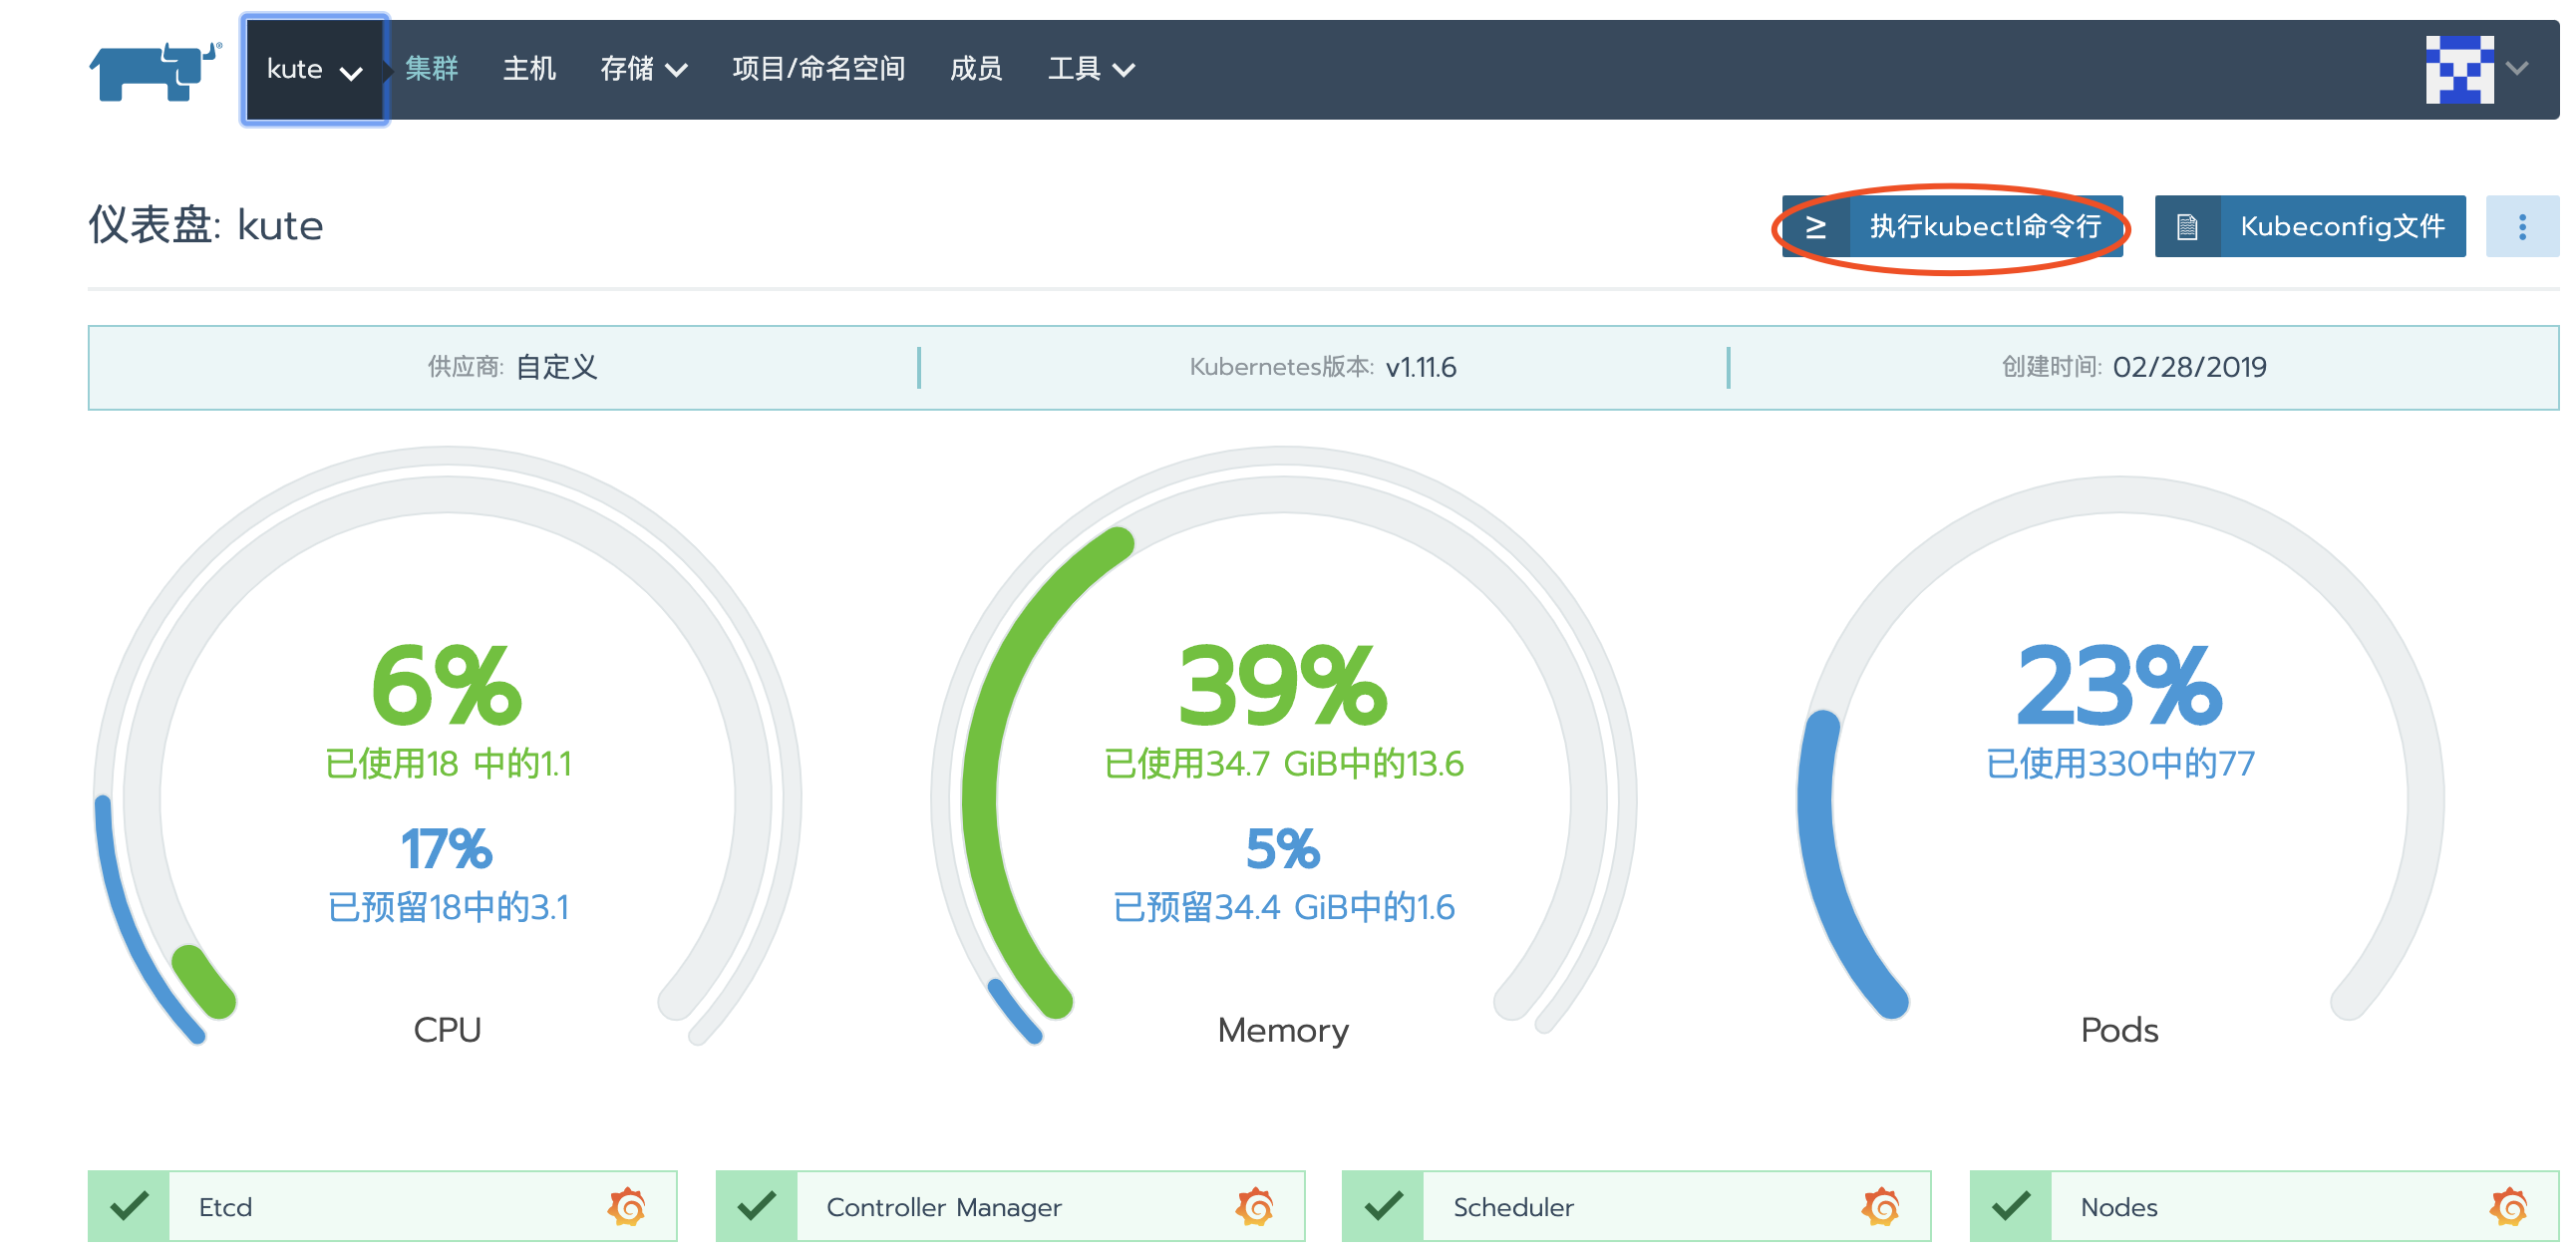
进入集群仪表盘,执行命令
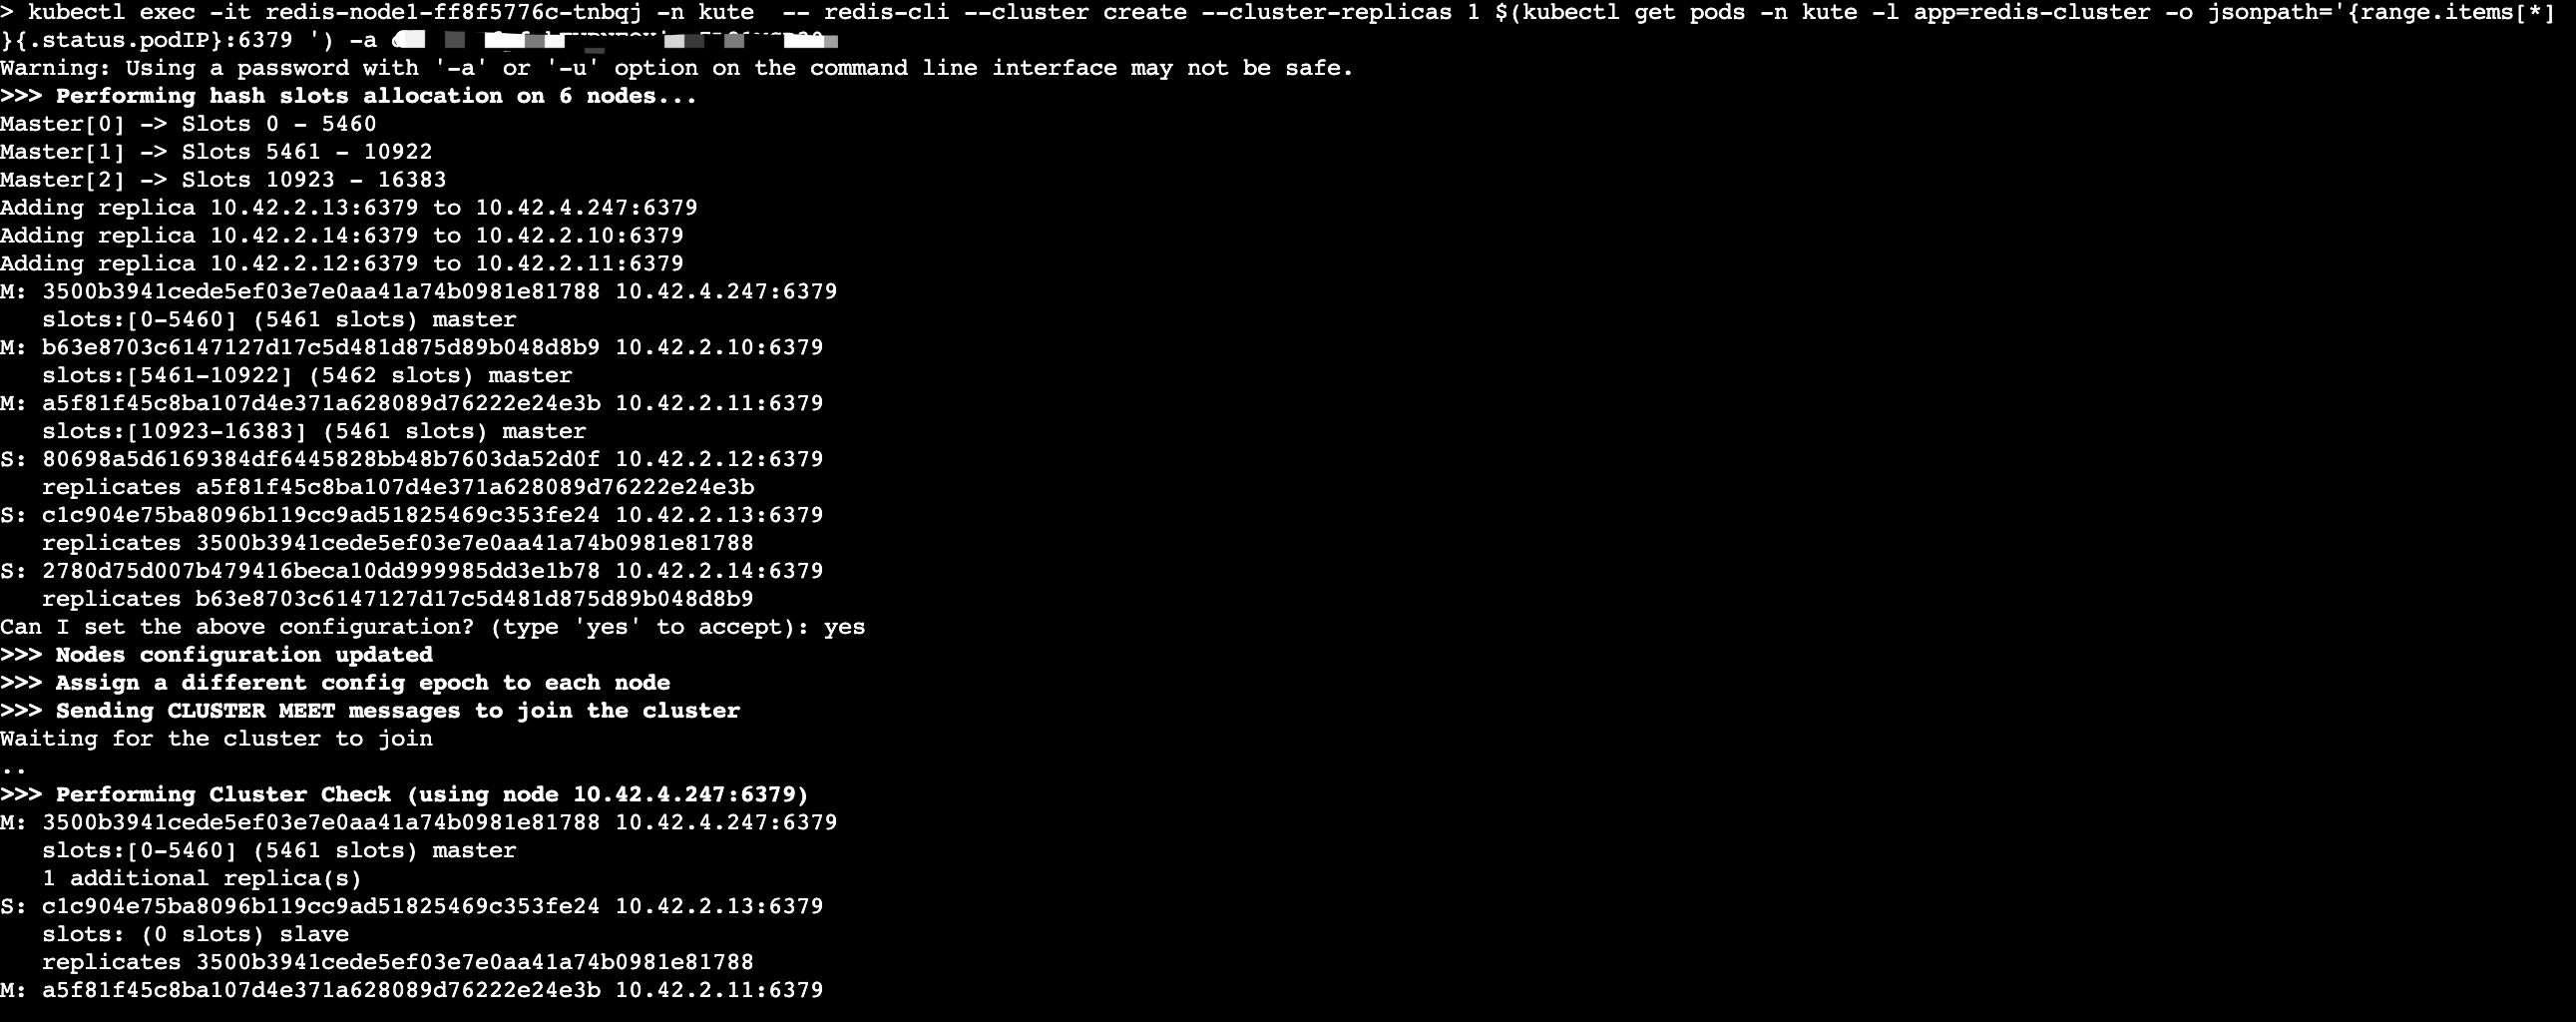
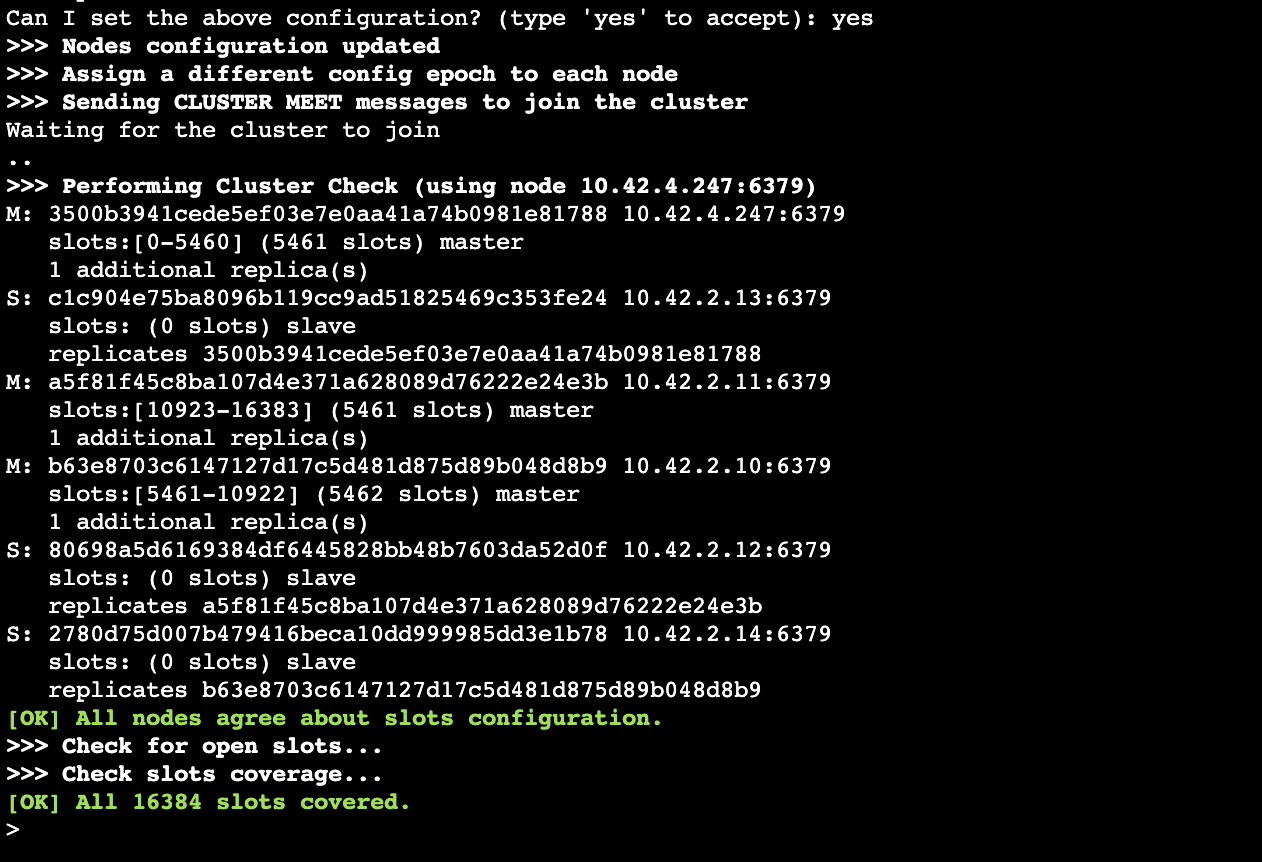
kubectl exec -it redis-node1-ff8f5776c-tnbqj -n kute -- redis-cli --cluster create --cluster-replicas 1 $(kubectl get pods -n kute -l app=redis-cluster -o jsonpath='{range.items[*]}{.status.podIP}:6379 {end}') -a 123456789集群pod创建好以后,还需要注册成为cluster,分配主从角色,使用kubectl命令,进入redis-node1 pod命令行,执行redis-cli集群注册。节点ip为pod ip。
redis-node1-ff8f5776c-tnbqj 为集群中任何一个pod,-n参数指定pod命名空间 -a参数指定客户端连接密码
redis-cli --cluster命令的完整参数为:
Cluster Manager Commands:
  create         host1:port1 ... hostN:portN
                 --cluster-replicas <arg>
  check          host:port
                 --cluster-search-multiple-owners
  info           host:port
  fix            host:port
                 --cluster-search-multiple-owners
  reshard        host:port
                 --cluster-from <arg>
                 --cluster-to <arg>
                 --cluster-slots <arg>
                 --cluster-yes
                 --cluster-timeout <arg>
                 --cluster-pipeline <arg>
                 --cluster-replace
  rebalance      host:port
                 --cluster-weight <node1=w1...nodeN=wN>
                 --cluster-use-empty-masters
                 --cluster-timeout <arg>
                 --cluster-simulate
                 --cluster-pipeline <arg>
                 --cluster-threshold <arg>
                 --cluster-replace
  add-node       new_host:new_port existing_host:existing_port
                 --cluster-slave
                 --cluster-master-id <arg>
  del-node       host:port node_id
  call           host:port command arg arg .. arg
  set-timeout    host:port milliseconds
  import         host:port
                 --cluster-from <arg>
                 --cluster-copy
                 --cluster-replace
  backup         host:port backup_directory
  help

For check, fix, reshard, del-node, set-timeout you can specify the host and port of any working node in the cluster.
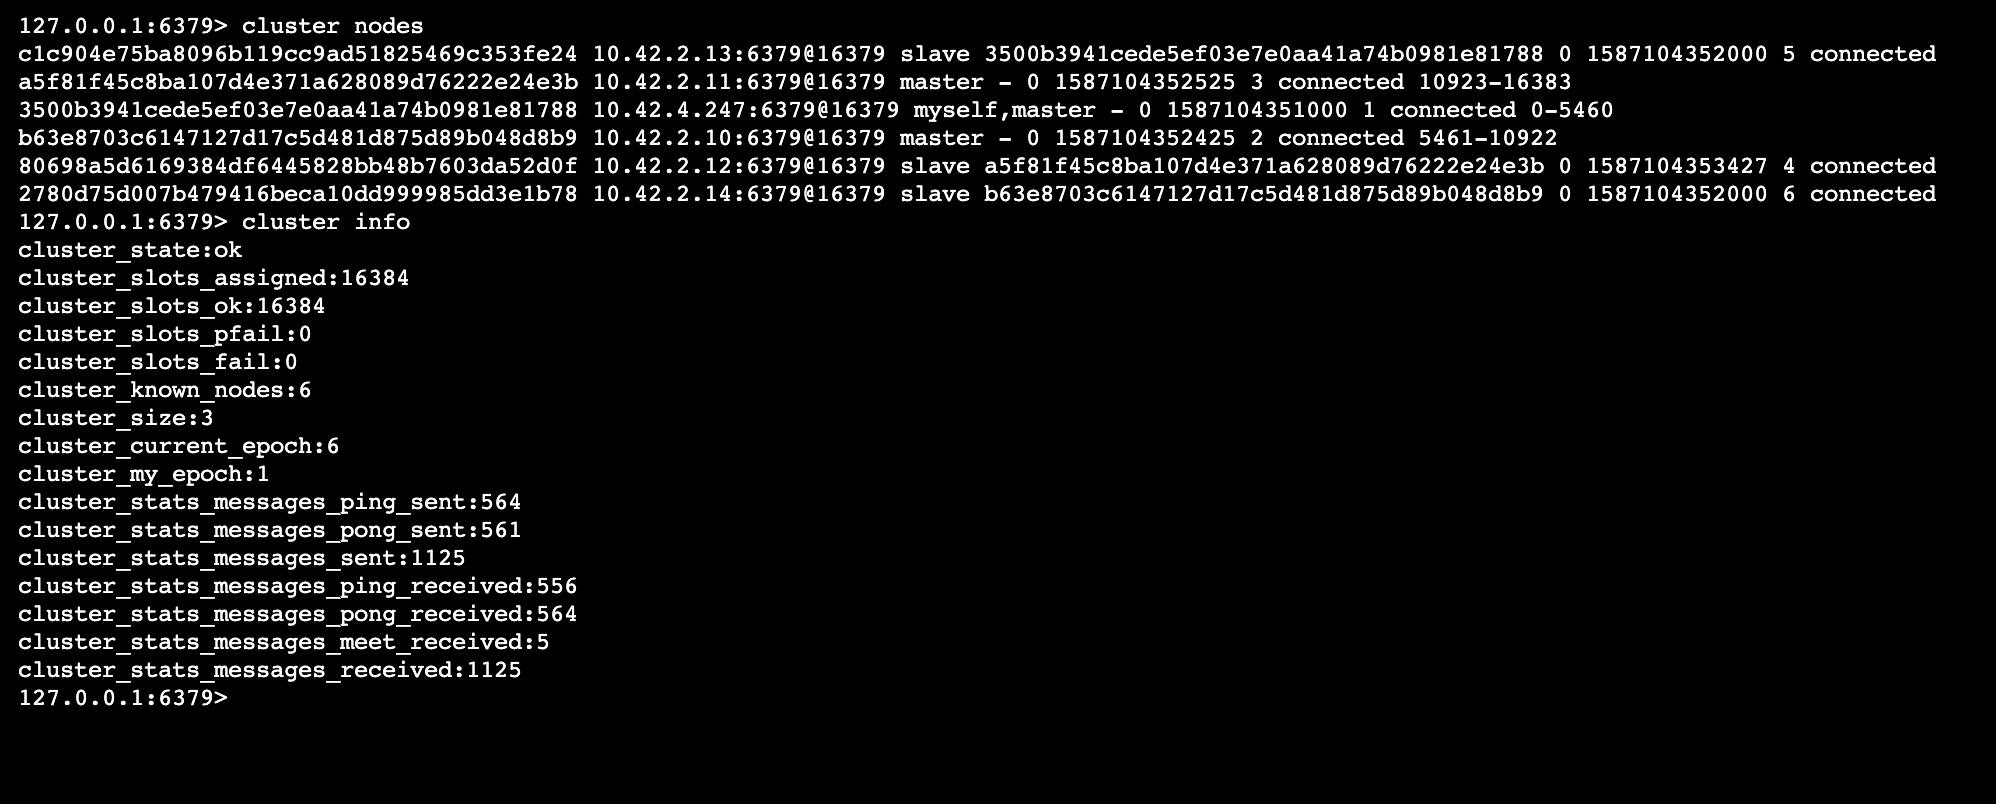
验证集群
列出集群当前已知的所有节点
cluster nodes 打印集群的信息
cluster info扩展
完整redis-cli命令参数:
redis-cli 5.9.103

Usage: redis-cli [OPTIONS] [cmd [arg [arg ...]]]
  -h <hostname>      Server hostname (default: 127.0.0.1).
  -p <port>          Server port (default: 6379).
  -s <socket>        Server socket (overrides hostname and port).
  -a <password>      Password to use when connecting to the server.
                     You can also use the REDISCLI_AUTH environment
                     variable to pass this password more safely
                     (if both are used, this argument takes predecence).
  --user <username>  Used to send ACL style 'AUTH username pass'. Needs -a.
  --pass <password>  Alias of -a for consistency with the new --user option.
  --askpass          Force user to input password with mask from STDIN.
                     If this argument is used, '-a' and REDISCLI_AUTH
                     environment variable will be ignored.
  -u <uri>           Server URI.
  -r <repeat>        Execute specified command N times.
  -i <interval>      When -r is used, waits <interval> seconds per command.
                     It is possible to specify sub-second times like -i 0.1.
  -n <db>            Database number.
  -3                 Start session in RESP3 protocol mode.
  -x                 Read last argument from STDIN.
  -d <delimiter>     Multi-bulk delimiter in for raw formatting (default: \n).
  -c                 Enable cluster mode (follow -ASK and -MOVED redirections).
  --tls              Establish a secure TLS connection.
  --sni <host>       Server name indication for TLS.
  --cacert <file>    CA Certificate file to verify with.
  --cacertdir <dir>  Directory where trusted CA certificates are stored.
                     If neither cacert nor cacertdir are specified, the default
                     system-wide trusted root certs configuration will apply.
  --cert <file>      Client certificate to authenticate with.
  --key <file>       Private key file to authenticate with.
  --raw              Use raw formatting for replies (default when STDOUT is
                     not a tty).
  --no-raw           Force formatted output even when STDOUT is not a tty.
  --csv              Output in CSV format.
  --stat             Print rolling stats about server: mem, clients, ...
  --latency          Enter a special mode continuously sampling latency.
                     If you use this mode in an interactive session it runs
                     forever displaying real-time stats. Otherwise if --raw or
                     --csv is specified, or if you redirect the output to a non
                     TTY, it samples the latency for 1 second (you can use
                     -i to change the interval), then produces a single output
                     and exits.
  --latency-history  Like --latency but tracking latency changes over time.
                     Default time interval is 15 sec. Change it using -i.
  --latency-dist     Shows latency as a spectrum, requires xterm 256 colors.
                     Default time interval is 1 sec. Change it using -i.
  --lru-test <keys>  Simulate a cache workload with an 80-20 distribution.
  --replica          Simulate a replica showing commands received from the master.
  --rdb <filename>   Transfer an RDB dump from remote server to local file.
  --pipe             Transfer raw Redis protocol from stdin to server.
  --pipe-timeout <n> In --pipe mode, abort with error if after sending all data.
                     no reply is received within <n> seconds.
                     Default timeout: 30. Use 0 to wait forever.
  --bigkeys          Sample Redis keys looking for keys with many elements (complexity).
  --memkeys          Sample Redis keys looking for keys consuming a lot of memory.
  --memkeys-samples <n> Sample Redis keys looking for keys consuming a lot of memory.
                     And define number of key elements to sample
  --hotkeys          Sample Redis keys looking for hot keys.
                     only works when maxmemory-policy is *lfu.
  --scan             List all keys using the SCAN command.
  --pattern <pat>    Useful with --scan to specify a SCAN pattern.
  --intrinsic-latency <sec> Run a test to measure intrinsic system latency.
                     The test will run for the specified amount of seconds.
  --eval <file>      Send an EVAL command using the Lua script at <file>.
  --ldb              Used with --eval enable the Redis Lua debugger.
  --ldb-sync-mode    Like --ldb but uses the synchronous Lua debugger, in
                     this mode the server is blocked and script changes are
                     not rolled back from the server memory.
  --cluster <command> [args...] [opts...]
                     Cluster Manager command and arguments (see below).
  --verbose          Verbose mode.
  --no-auth-warning  Don't show warning message when using password on command
                     line interface.
  --help             Output this help and exit.
  --version          Output version and exit.

Cluster Manager Commands:
  Use --cluster help to list all available cluster manager commands.

Examples:
  cat /etc/passwd | redis-cli -x set mypasswd
  redis-cli get mypasswd
  redis-cli -r 100 lpush mylist x
  redis-cli -r 100 -i 1 info | grep used_memory_human:
  redis-cli --eval myscript.lua key1 key2 , arg1 arg2 arg3
  redis-cli --scan --pattern '*:12345*'

  (Note: when using --eval the comma separates KEYS[] from ARGV[] items)

When no command is given, redis-cli starts in interactive mode.
Type "help" in interactive mode for information on available commands
and settings.




请问,如果想要在一个工作负载里部署6个pod,怎么配置数据卷的挂载呢?
redis 集群 --cluster create 命令这里kubectl exec -it redis-node1-86855f9f85-8d9vs -n redis -- redis-cli --cluster create --cluster-replicas 1 $(kubectl get pods -n redis -l app=redis-cluster -o jsonpath='{range.items[*]}{.status.podIP}:6379 {end}') -a 123456789这里的 jsonpath 内容最后 需要加个{end} 否则最后会多出来一个 :6379
@Wei : rancher 2.6+,rancher升级一下在搞个文档呗
@Wei : 非常感谢您提供的反馈,已经更新文档
@Wei : 你的意思是有两个:6379吗?
我按照这个做下来发现一只等待其他节点加入集群。大概是会在那里出错呢?
@netsion : 哦豁,知道为什么了。犯了一个错误,我在安装的时候6个pod只有一个pvc-pv,应该提前为6个pod分别创建他们的pvc和pv,最后在克隆pod的时候,不仅要搞工作负载的名称,还有改一下对应的数据卷。还做了一个额外的操作,就是16379集群总线端口在配置集群IP的基础上,还配置了NodePort,不知道这个配置是不是也会影响。
@netsion : pv和pvc可以用一个,只要6个pod不是挂载在同一个目录就可以,保证数据不被相互覆盖。
第二张图片是不是上传错了?
@l l : 是上传重复了,已经修复了