数据无价,操作前请先备份数据!!!备份!!!备份!!!备份!!!
调整硬盘
通过PVE的WEB控制台->目标主机->硬件->目标硬盘->硬盘操作->调整大小 设置需要扩容的磁盘大小
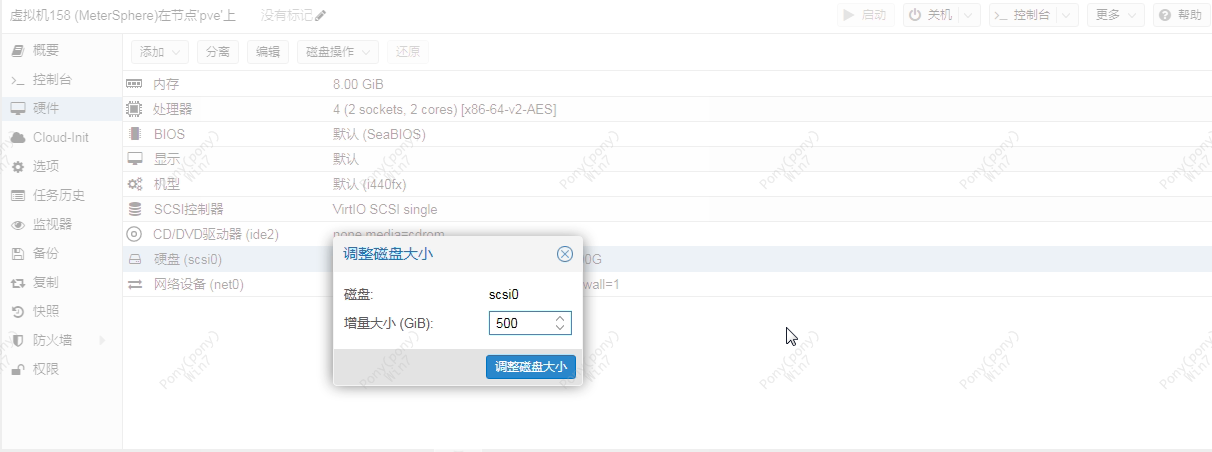
通过SSH访问目标主机,使用fdisk -l命令确认磁盘已经调整到预期大小
root@MeterSphere:~# fdisk -l
Disk /dev/sda: 600 GiB, 644245094400 bytes, 1258291200 sectors
Disk model: QEMU HARDDISK
Units: sectors of 1 * 512 = 512 bytes
Sector size (logical/physical): 512 bytes / 512 bytes
I/O size (minimum/optimal): 512 bytes / 512 bytes
Disklabel type: dos
Disk identifier: 0x46f972ae

Device     Boot     Start       End   Sectors  Size Id Type
/dev/sda1  *         2048 207714303 207712256   99G 83 Linux
/dev/sda2       207716350 209713151   1996802  975M  5 Extended
/dev/sda5 207716352 209713151 1996800 975M 82 Linux swap / Solaris原先只有100GB,现在可以看到已经调整到了600GB,但是/dev/sda1还是只有99GB
无损扩容
扩容的空间在磁盘的最后,要扩容sda1必须先删除后面的扩展分区sda2和逻辑分区sda5,再重新创建swap分区
关闭swap分区
通过free命令查看swap是否存在占用,如果没有,直接关掉(swapoff /dev/sda5);如果有,可以尝试重启下该虚拟机
root@MeterSphere:~# free -h
               total        used        free      shared  buff/cache   available
Mem:           7.8Gi       439Mi       5.9Gi       496Ki       1.7Gi       7.3Gi
Swap:          974Mi          0B       974Mi
root@MeterSphere:~# swapoff /dev/sda5
root@MeterSphere:~# free -h
               total        used        free      shared  buff/cache   available
Mem:           7.8Gi       439Mi       5.9Gi       496Ki       1.7Gi       7.3Gi
Swap:             0B          0B          0B
查看初始扇区
parted /dev/sda unit s printroot@MeterSphere:~# parted /dev/sda unit s print
Model: QEMU QEMU HARDDISK (scsi)
Disk /dev/sda: 1258291200s
Sector size (logical/physical): 512B/512B
Partition Table: msdos
Disk Flags:
Number Start End Size Type File system Flags
1 2048s 207714303s 207712256s primary ext4 boot
2 207716350s 209713151s 1996802s extended
5 207716352s 209713151s 1996800s logical linux-swap(v1) swap确认初始扇区为2048,假如你的虚拟机磁盘初始扇区是 63 而不是 2048, 你需要在 fdisk 命令后面增加一个参数 -c=dos
重新配置分区列表
root@MeterSphere:~# fdisk /dev/sda

Welcome to fdisk (util-linux 2.38.1).
Changes will remain in memory only, until you decide to write them.
Be careful before using the write command.

This disk is currently in use - repartitioning is probably a bad idea.
It's recommended to umount all file systems, and swapoff all swap
partitions on this disk.


Command (m for help): p

Disk /dev/sda: 600 GiB, 644245094400 bytes, 1258291200 sectors
Disk model: QEMU HARDDISK
Units: sectors of 1 * 512 = 512 bytes
Sector size (logical/physical): 512 bytes / 512 bytes
I/O size (minimum/optimal): 512 bytes / 512 bytes
Disklabel type: dos
Disk identifier: 0x46f972ae

Device     Boot     Start       End   Sectors  Size Id Type
/dev/sda1  *         2048 207714303 207712256   99G 83 Linux
/dev/sda2       207716350 209713151   1996802  975M  5 Extended
/dev/sda5       207716352 209713151   1996800  975M 82 Linux swap / Solaris

Command (m for help): d
Partition number (1,2,5, default 5): 2

Partition 2 has been deleted.

Command (m for help): d
Selected partition 1
Partition 1 has been deleted.

Command (m for help): n
Partition type
   p   primary (0 primary, 0 extended, 4 free)
   e   extended (container for logical partitions)
Select (default p): p
Partition number (1-4, default 1): 1
First sector (2048-1258291199, default 2048):
Last sector, +/-sectors or +/-size{K,M,G,T,P} (2048-1258291199, default 1258291199): 1256294397

Created a new partition 1 of type 'Linux' and of size 599 GiB.
Partition #1 contains a ext4 signature.

Do you want to remove the signature? [Y]es/[N]o: N

Command (m for help): n
Partition type
   p   primary (1 primary, 0 extended, 3 free)
   e   extended (container for logical partitions)
Select (default p): p
Partition number (2-4, default 2): 2
First sector (1256294398-1258291199, default 1256294400):
Last sector, +/-sectors or +/-size{K,M,G,T,P} (1256294400-1258291199, default 1258291199):

Created a new partition 2 of type 'Linux' and of size 975 MiB.

Command (m for help): a
Partition number (1,2, default 2): 1

The bootable flag on partition 1 is enabled now.

Command (m for help): w
The partition table has been altered.
Syncing disks.
注意事项
- sda1 扩容后的总大小必须是整个磁盘减去 swap 分区的大小,我上面的例子 sda1 就是: 1258291199-1996802=1256294397
- fdisk 分区使用'a'命令是用来激活主分区,这个一定要重新激活。
- 如果在创建分区时提示
Partition #1 contains a ext4 signature.一定要选择N,因为虽然重新创建了/dev/sda1,但文件系统本身仍然存在,你的数据(包括操作系统)还在原来的 ext4 文件系统中。如果你输入 Y,fdisk 会清除这个签名(即破坏文件系统结构),可能导致系统无法启动、数据丢失
重载分区列表
这里使用到的是 partprobe,OMV 是基于 Debian 的,默认应该安装了,如果没有安装请自行搜索安装方法.
root@MeterSphere:~# partprobe重新扫描磁盘容量
使用 resize2fs 命令对 sda1 进行扩容有重扫描容量
root@MeterSphere:~# resize2fs /dev/sda1
resize2fs 1.47.0 (5-Feb-2023)
Filesystem at /dev/sda1 is mounted on /; on-line resizing required
old_desc_blocks = 13, new_desc_blocks = 75
The filesystem on /dev/sda1 is now 157036543 (4k) blocks long.
重新配置swap分区
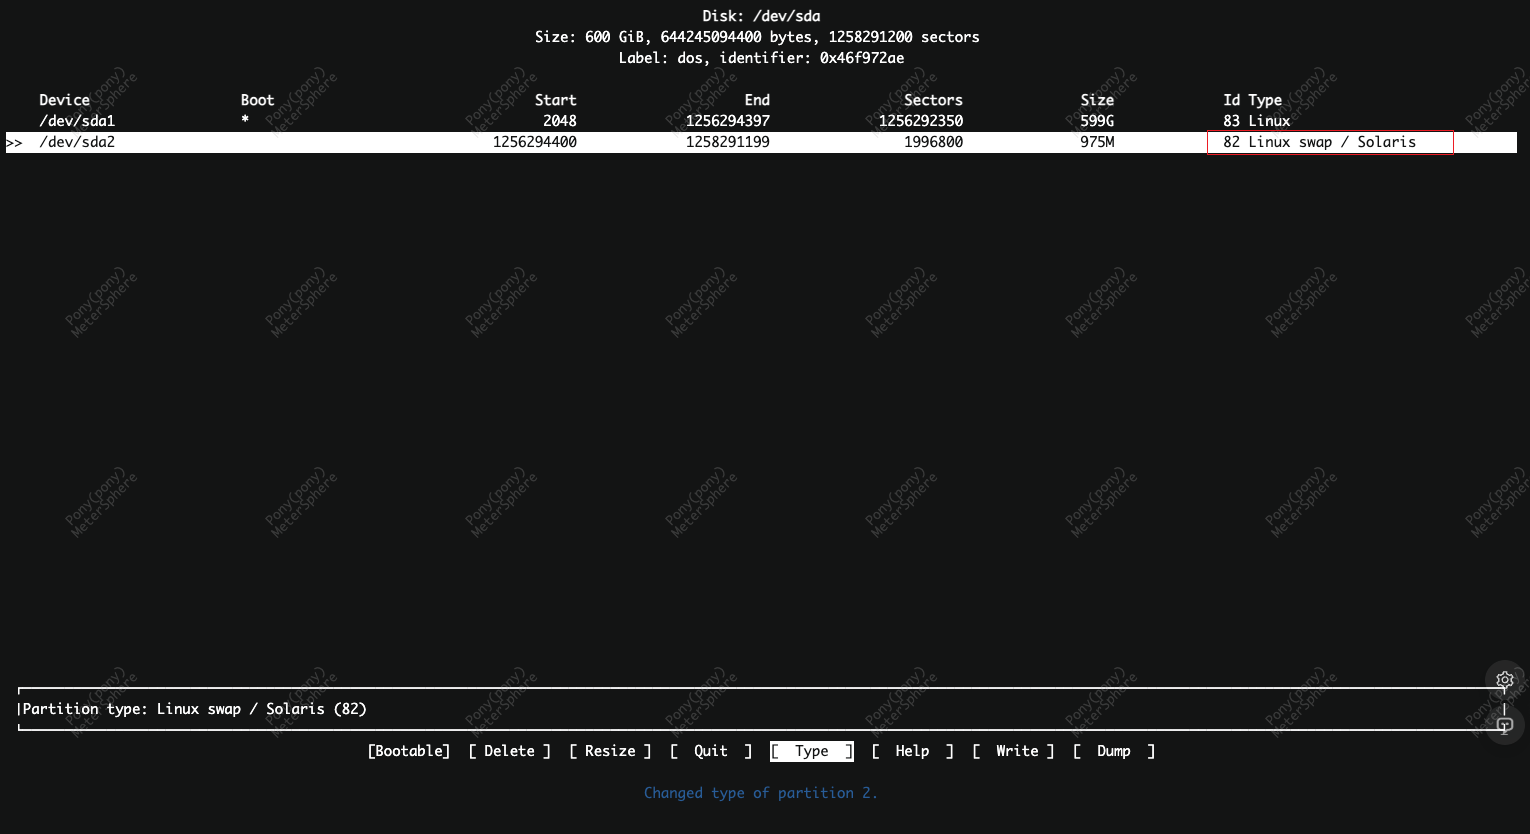
因为 fdisk 对 ext4 扩展分区支持不足,建议使用 cfdisk 进行重新配置 swap 分区。
root@MeterSphere:~# cfdisk 进入 cfdisk 图形界面,你会看到类似这样的界面(使用方向键导航):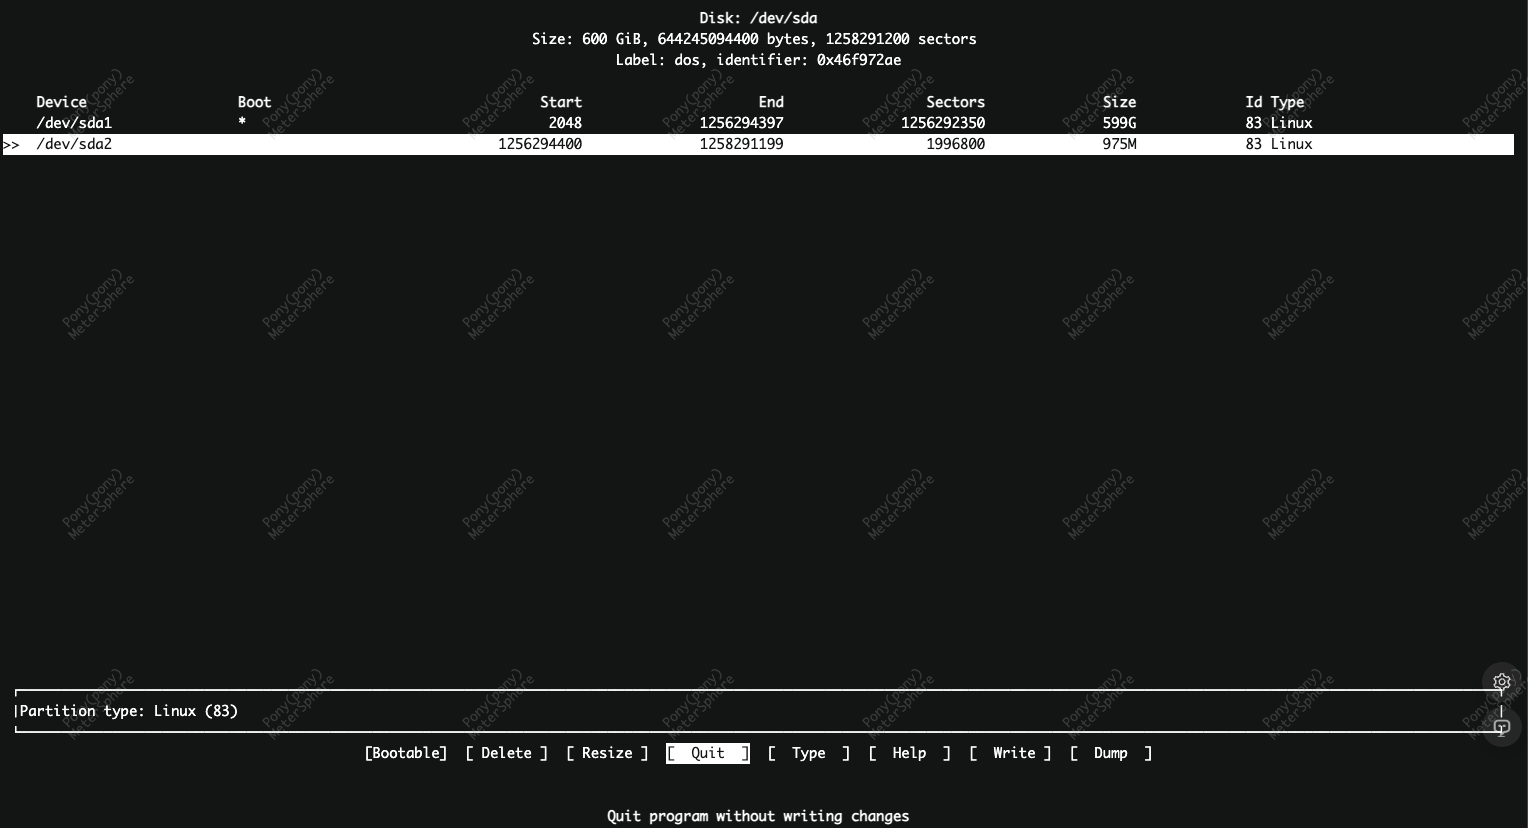
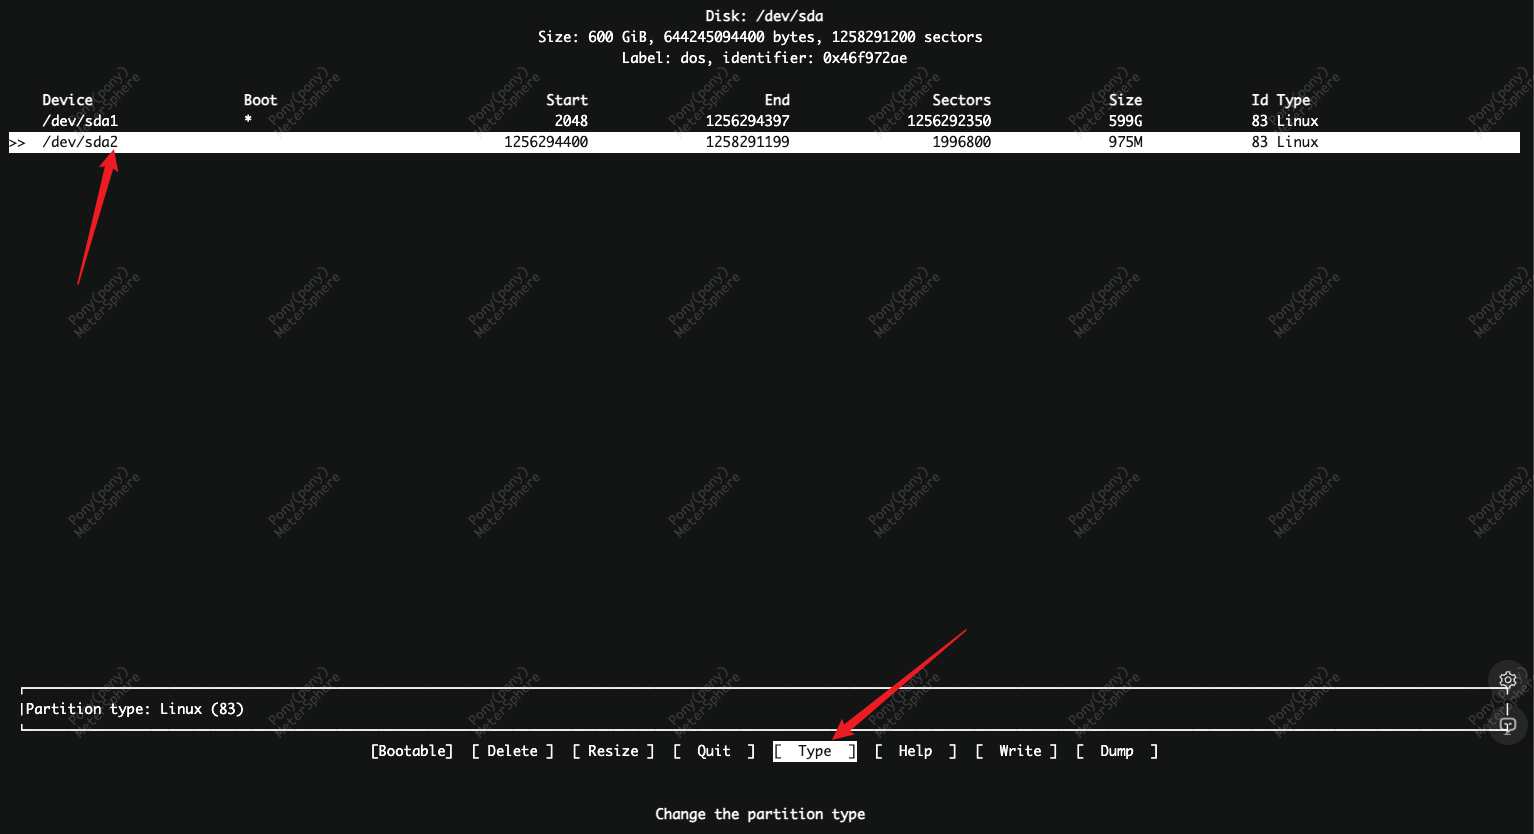
使用 上下箭头 移动光标到你想修改的分区(这里是 /dev/sda2)
修改分区类型
- 选中
/dev/sda2 - 使用 左右箭头 选择底部的菜单项:Type(类型)
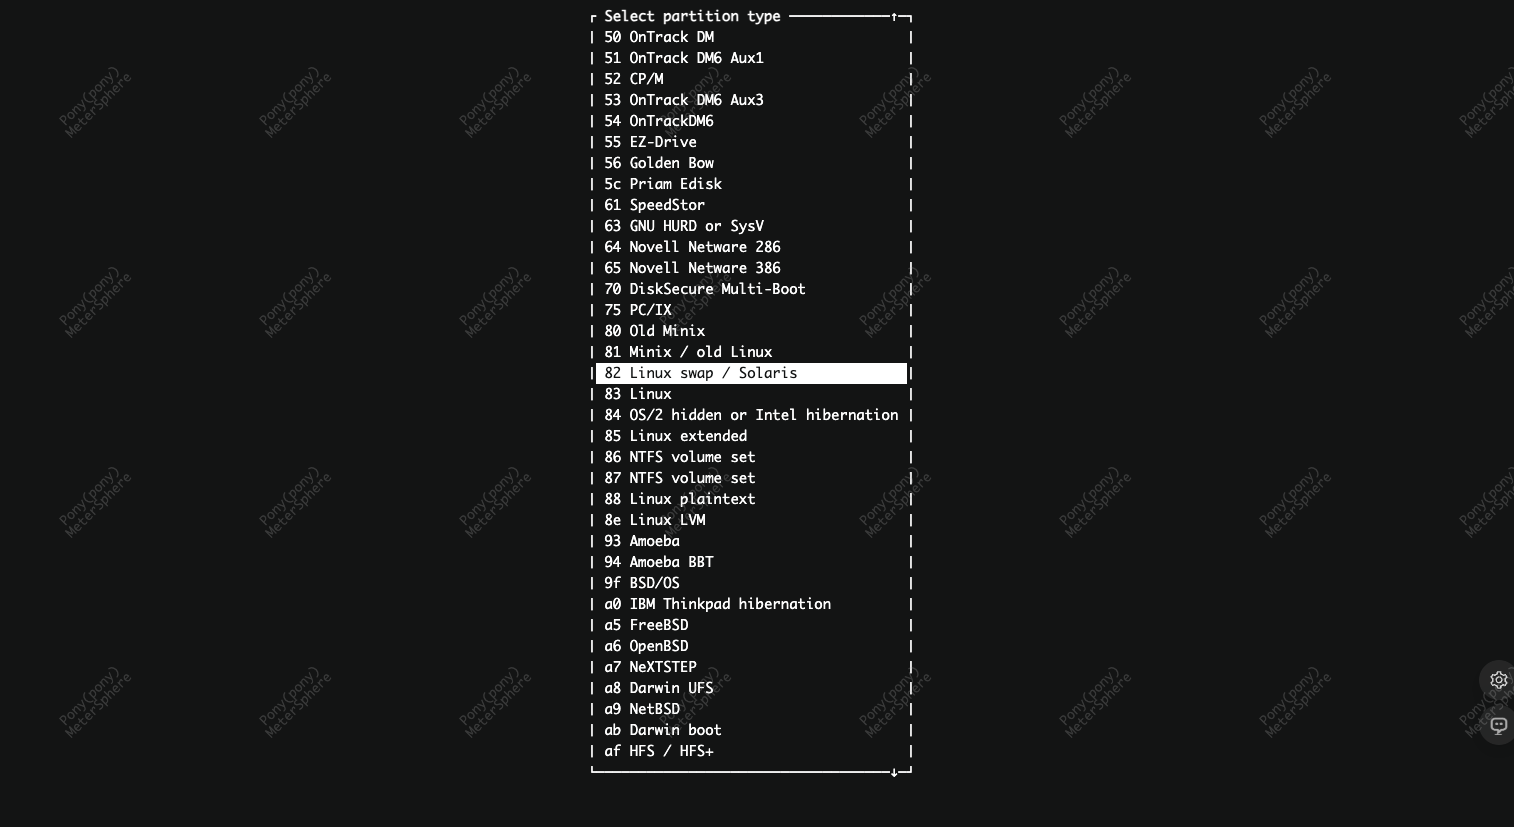
- 按回车,会弹出一个列表,显示所有可能的分区类型。
- 使用上下箭头滚动,找到:
82 Linux swap / Solaris - 选中它,按回车确认。此时 /dev/sda2 的类型会变成
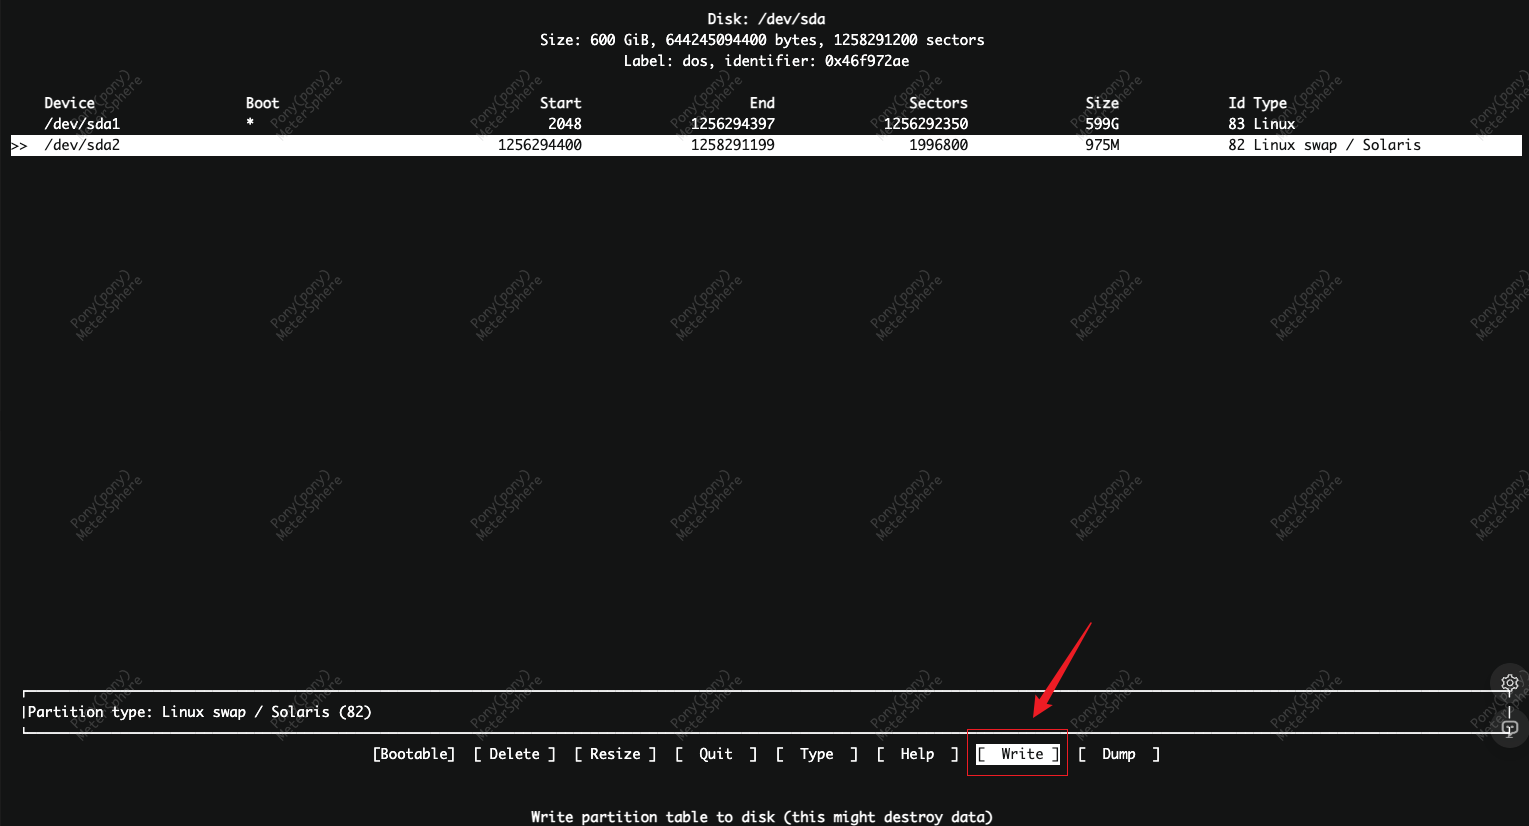
Linux swap / Solaris - 写入更改,使用左右箭头选择底部菜单中的:Write
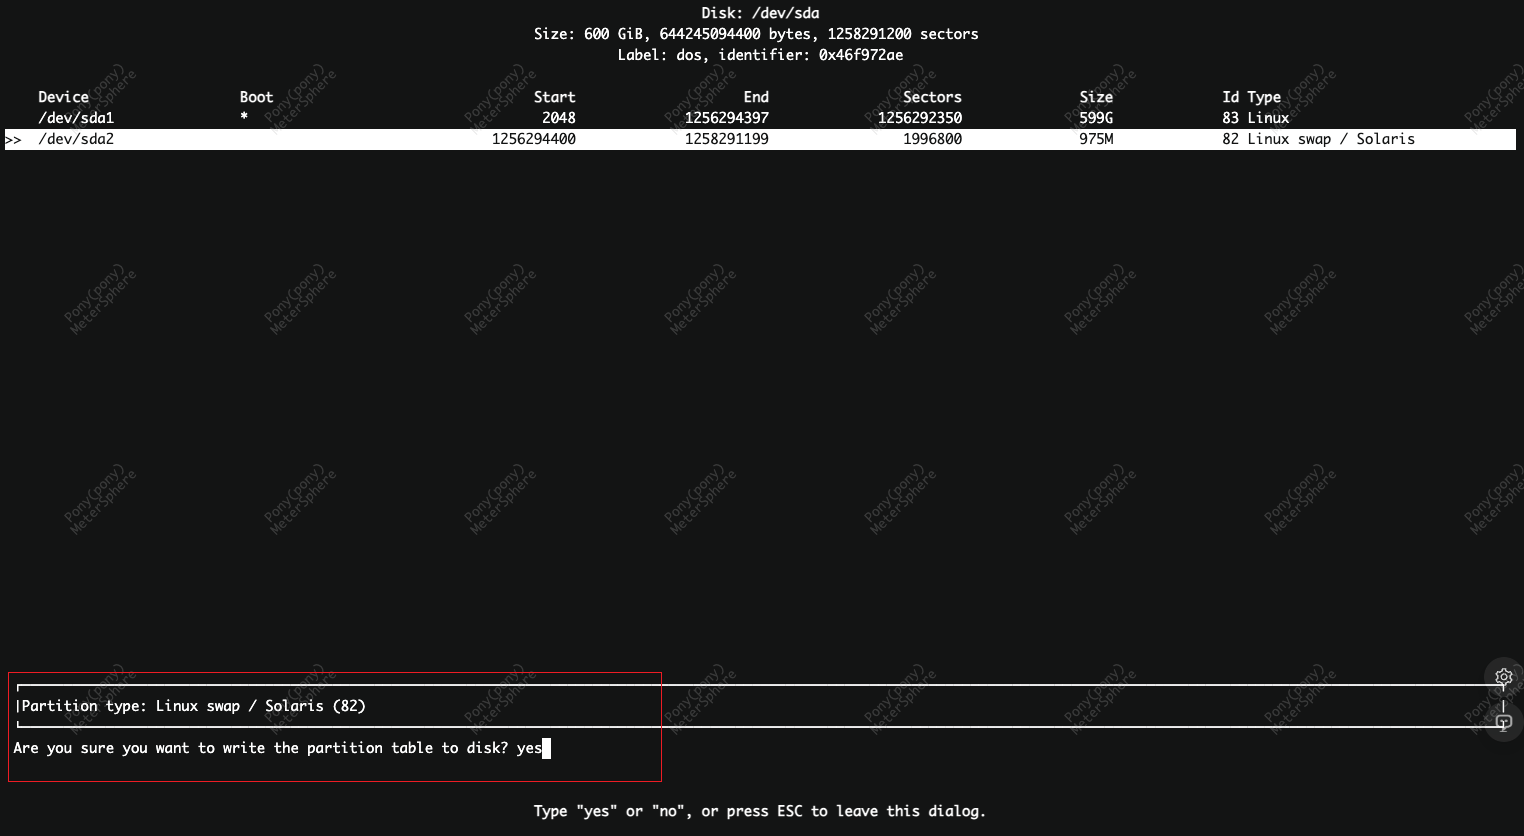
- 按回车,系统会提示:`Are you sure you want to write the partition table to disk?
Yes/No:`,输入:yes(小写),然后回车,分区表已成功写入磁盘! - 退出,再次使用方向键选择 Quit,按回车退出 cfdisk
格式化并启用 Swap
格式化为 swap
root@MeterSphere:~# mkswap /dev/sda2
Setting up swapspace version 1, size = 975 MiB (1022357504 bytes)
no label, UUID=8cd13ca6-1919-418c-b3c8-a2248835eb81
启用 swap
root@MeterSphere:~# swapon /dev/sda2永久启用(修改 /etc/fstab)swap
获取 swap 分区的 UUID:
root@MeterSphere:~# blkid /dev/sda2
/dev/sda2: UUID="8cd13ca6-1919-418c-b3c8-a2248835eb81" TYPE="swap" PARTUUID="46f972ae-02"
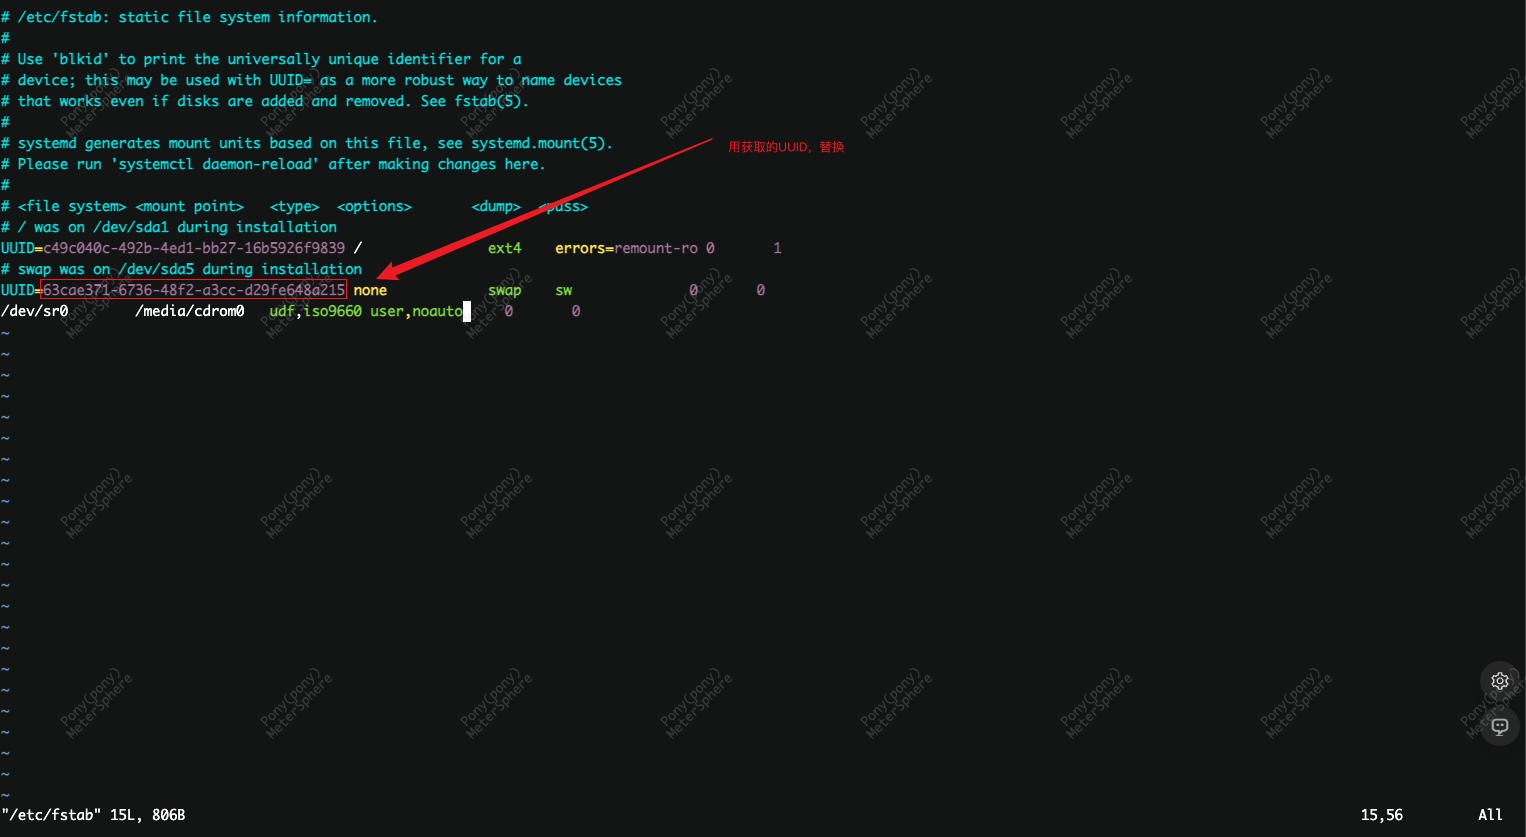
编辑 /etc/fstab
替换为上面获取到的UUID,这样系统重启后也会自动启用 swap
root@MeterSphere:~# vim /etc/fstab验证
root@MeterSphere:~# swapon --show
NAME      TYPE      SIZE USED PRIO
/dev/sda2 partition 975M   0B   -2
root@MeterSphere:~# free -h
               total        used        free      shared  buff/cache   available
Mem:           7.8Gi       441Mi       5.8Gi       496Ki       1.7Gi       7.3Gi
Swap:          974Mi          0B       974Mi
root@MeterSphere:~# fdisk -l
Disk /dev/sda: 600 GiB, 644245094400 bytes, 1258291200 sectors
Disk model: QEMU HARDDISK
Units: sectors of 1 * 512 = 512 bytes
Sector size (logical/physical): 512 bytes / 512 bytes
I/O size (minimum/optimal): 512 bytes / 512 bytes
Disklabel type: dos
Disk identifier: 0x46f972ae

Device     Boot      Start        End    Sectors  Size Id Type
/dev/sda1  *          2048 1256294397 1256292350  599G 83 Linux
/dev/sda2       1256294400 1258291199    1996800  975M 82 Linux swap / Solaris
root@MeterSphere:~# df -lh
Filesystem      Size  Used Avail Use% Mounted on
udev            3.9G     0  3.9G   0% /dev
tmpfs           795M  496K  794M   1% /run
/dev/sda1       590G  2.4G  562G   1% /
tmpfs           3.9G     0  3.9G   0% /dev/shm
tmpfs           5.0M     0  5.0M   0% /run/lock
tmpfs           795M     0  795M   0% /run/user/0
确保没有问题后,重启虚拟机。
至此,无损扩容工作便全部完成。
祝你好运!


Comments | NOTHING